Upstream regulator
A quality water-pressure regulator installed before the unit (recommended model: Honeywell FK‑06, one inch, with filter).
泡 noa · installation manual
Technical manual for the professional who installs CO₂ descaling. It covers prescriptions and limits, mounting, gas adjustment, verification, record-keeping and special cases. It does not replace the manufacturer's manual or technical training: it arranges it in byaccuor's voice.
prescriptions and limits
The manufacturer requires them for any work under warranty. They are part of the installation service.
A quality water-pressure regulator installed before the unit (recommended model: Honeywell FK‑06, one inch, with filter).
The injection is set to reach the pH that corresponds to the hardness of that water (calcium-carbonate equilibrium).
Measurement of the treated water with a calibrated professional pH meter.
Water pressure, CO₂ pressure and meter index noted on the door hanger.
Usage limits · installer's attention. Installing NOA is prohibited if the plumbing is made of lead. Do not use hemp on the connection between the CO₂ reducer and the unit. Activated-carbon filters go before the unit. Some taps with a filtering system, water savers or instant hot-water production may not be compatible; certain industrial dishwashers and steam ovens may not be protected. In any of these cases, consult technical support before installing.
mounting · part 1 · water and electricity
It is installed as close as possible to the official meter, so that all the water of the home or premises passes through it.
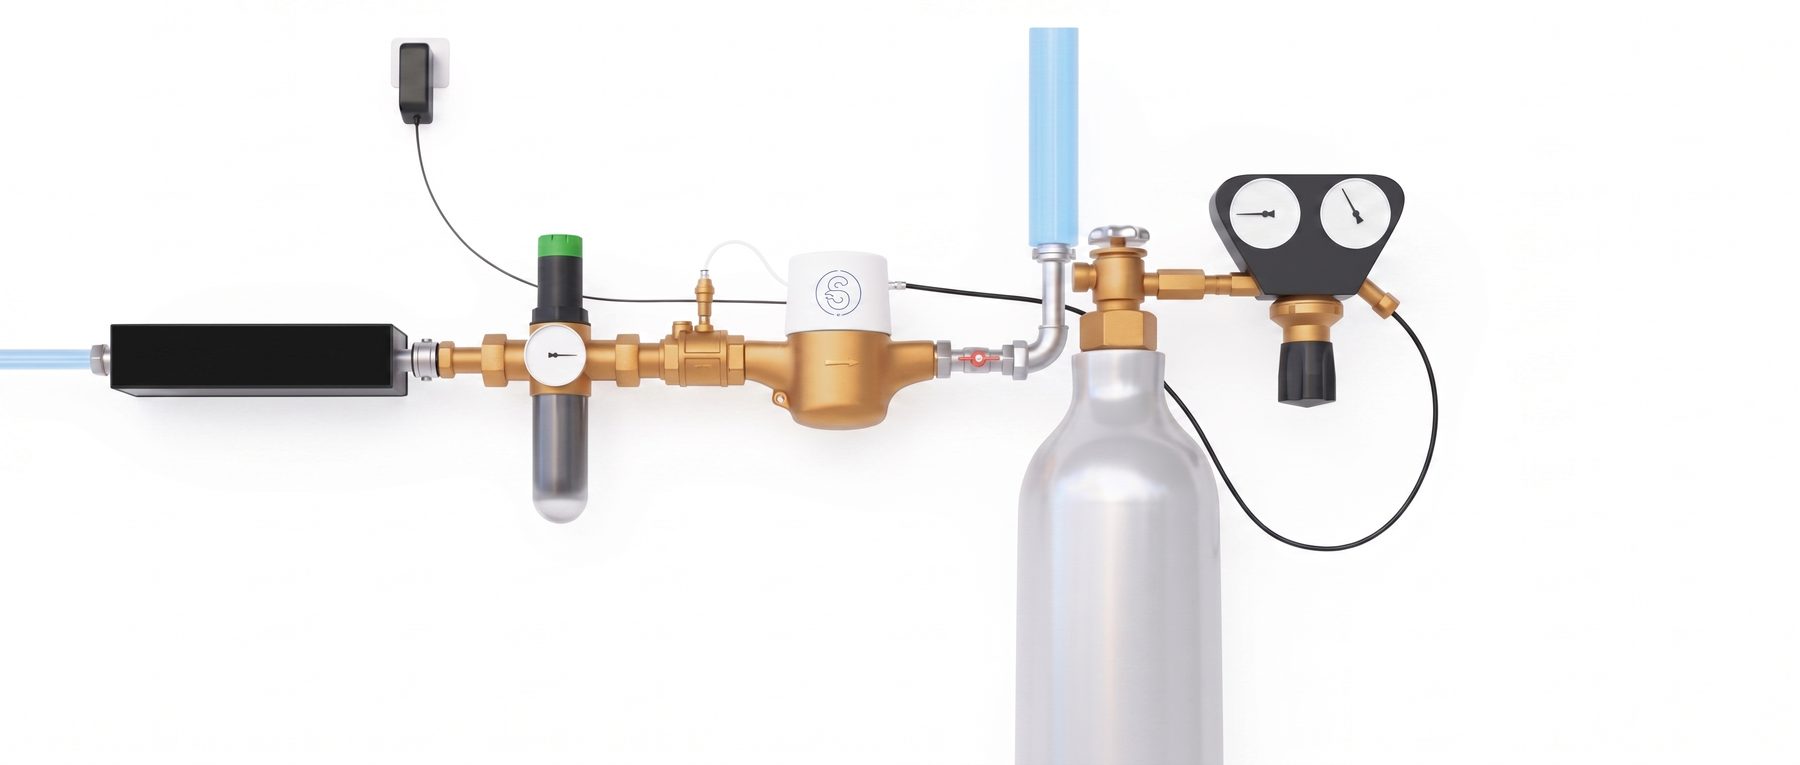
Entry point of the mains water and consumption reference for tracking the cylinder.
Stabilises the mains before the injection. It is installed always horizontally and in the correct direction (arrow).
In the correct direction (arrow); it allows vertical mounting. Connect the included 12 V transformer and check that the green LED lights up (power OK).
Open the water circuit and check the tightness of all the fittings.
mounting · part 2 · CO₂
Temperature affects the cylinder pressure: it can drop to 25 bar in winter and exceed 50 in the sun. The pressure shown does not reflect the remaining gas.
It is done on the dynamic water pressure, so a water outlet must be open during the process. It is not repeated when changing the cylinder, unless the reducer wheel is touched. Beforehand, the water-pressure regulator must be set below the dynamic pressure.
Fully open the kitchen cold-water tap and keep it open during the whole process.
Screw the reducer wheel all the way in (it is limited to 4–5 bar) and unscrew it all the way back out.
The right gauge (low pressure) drops and stops at the dynamic water pressure. Let the water run until the treated water reaches the tap.
Screw the wheel to start at a minimum of +0,2 bar above that pressure. The working point is usually between +0,1 and +0,4 bar depending on the hardness.
Close the tap. Then, measure the pH of the treated water: if it stays above the target, raise the gas little by little; if it stays below, lower it. Repeat until the target pH.
verification · the target pH
The target pH is the saturation pH of the calcium-carbonate equilibrium for the inlet hardness. The more limescale there is to transform, the lower it is. The area's hardness is public information from the supplier, and the adjustment is only accepted by measuring with a calibrated pH meter. The target pH never drops below 6,5.
Indicative values from the manufacturer's calcium-carbonate curve; the exact target is read on the curve for the specific hardness and confirmed with the meter. Example: in Liège, with 42 ºfH, the target is ≈ 6,7 (starting from a mains pH ≈ 8). CO₂ consumption is proportional to the limescale to be transformed.
commissioning record
They are noted on the door hanger and are a warranty condition. This adjustment is done only once and is not repeated when changing the cylinder.
the pressure regulator
A quality regulator is essential: it limits the dynamic pressure so the unit can be adjusted and prevents mains variations from throwing off the dosing.
the CO₂ cylinder
As long as there is liquid CO₂, the left gauge always reads the same (25–100 bar depending on temperature, average ≈ 50) and does not drop like a car's fuel tank. It only falls quickly when the liquid runs out: below 10 bar, the cylinder is empty.
special cases
signals and service
pH-meter calibration
Verification is only valid with the meter calibrated. Calibration (e.g. Testo 206) is done at two points, with buffer solutions of pH 4 and pH 7.
Turn on the meter and enter calibration with a long press of «CAL»: point 4 appears and «CAL» flashes.
Immerse the probe in buffer solution 4 and press «CAL». When «AUTO» stays steady and the beep sounds, point 4 is done. Rinse the probe in clean water.
Press «CAL» (pH 7 flashes) and immerse in the pH 7 solution. When «AUTO» stays steady and the beep sounds, point 7 is done.
The offset and the slope (mV/pH) are shown. Press «CAL» one last time: the display turns off and the meter is calibrated. Do not leave it in the sun or in the car.
connected monitoring · optional
On the unit's cover (compatible with 1 and 2 inches) the connected module can be added, with an app for the customer and a portal for the installer.
Consumption and alerts
Real-time pH and safety
泡 professional support
For questions of compatibility, sizing, CO₂ detector or commissioning, byaccuor's technical team supports the installation. The prices of unit, cylinder, installation and maintenance are worked out by the sales team.
Technical support → Back to NOA →